verb [ trans. ]
• give (furniture, leather, or clothing) simulated marks of age and wear
antique |(,)an-ˈtēk|
verb [ trans. ]
• to finish or refinish in antique style : give an appearance of age to
verb [ trans. ]
• to finish or refinish in antique style : give an appearance of age to

I love to distress/antique pretty much everything I do. If it doesn't look old, I NEED to make it look that way! I wanted to share with you some tips of grunging something up. When something is newly painted it looks very clean but personality-less. Frankly it can just look home painted (you know what I mean). You notice that most furniture you buy is not a solid color it has some degree of distressing to it. Whether it is sanded or brushed with color it adds character and uniqueness of your piece. If you can spray your paint on it tends to have a smoother finish, and when brushing is is a little thicker. I can't say if I prefer one over the other because both are great in their own desired look.
So lets get started: (prep)
If you are painting an item that has a finish on it you need to sand it for sure to give the paint something to stick to. (It doesn't need to be very rough, I would say a 120 grit sand paper would be sufficient.) If the finish you have is oil base you may need to use a primer. Keep in mind that the primer color will show through when you distress it so I don't usually like to prime if I don't really have to. You can tint primer, but it does cost more than just using the natural wood that your item may already have, and I'm not sure if you can get it that dark. When painting an item that you want to distress keep in mind that whatever your color it is before is the color you will see when you sand it off for distressing. (if you decide to sand it) So sometimes you need to paint it a desired base color, let it completely dry, and then apply your top coat. Make sure before you do any distressing you let your item completely dry. (I would wait a day or two depending your the humidity in your area)
Now I will explain in detail the different methods to distress.
 Crackle- Crackle medium is a product that you use in between two layers of different paint colors that give the appearance of crackling and age. You can buy
crackle medium at craft stores
but I prefer to just get a quart of it at Home Depot. Behr makes a great crackle medium that will go a long way and is great for medium to large projects. Follow the manufactures instructions and you can't go wrong. Crackling can be intimidating because you can't go back. The top coat needs to cover good because if you go back over it with your brush it will pull it up and can ruin the look you were after. But you can do it. Just follow the instructions. And don't be too picky, the imperfections of this method are what make it so great.
 Sanding- I have put my mouse sander through plenty of projects. It has earned itself many times over. Sanding an object really gives it that natural 'wear and tear' look. But there is a secret and you can over do it. The secret to sanding to distress is to make it look like it naturally happened. Pay special attention to the raised areas that normally would have distressed on its own. Also the sides and corners of objects would have some good wear and tear. If you have a large flat area pick random areas to make the paint a little thiner showing the color underneath. When ever doing the finishing distressing you should use a finer grit of sand paper. I would stick with 180-220 grit. You don't want it to looked scratched with rough paper. It just needs to look worn. And when sanding be sure your paint is good and dry so you won't gum up your sand paper.
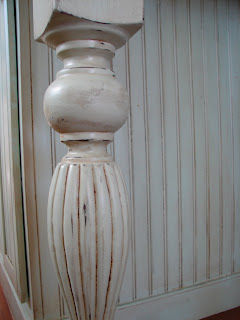
Paint- paint is a great way to make an item look distressed. It is ideal when you don't want the under color of the paint to show through by sanding. My sister-in-law painted her moulding black and wanted the distressing to have a gold look to it. It looks quite fabulous. She took some rub and buff metallic gold paint and just rubbed it on with her fingers. She even played with some non metallic gold to add some extra depth to the project. In her wainscoting paneling she rubbed paint into
the creases of the raised panels with a brush and pulled
off the excess with a rag.

Other methods you could use would be dry brushing small amounts on the areas you would normally sand to replicate normal wear and tear. Or just rubbing on the paint with a cloth. You really need to just play with it to get the look you want. Also something else to consider with paint acting as a distressing agent is to replicate the painted and painted again look. When you use a multistep process for aging an object sanding it and chipping the paint away will show the different colors underneath simulating year of paint jobs showing through.
*paint buying tip: If you are doing a large project I recommend buying interior acrylic house paint. And being the cheapskate that I am I ALWAYS check the oops paint rack first. Many times if the paint counter person is nice they may even let you add color to the oops paint. Check the sheen as well to assure you are getting the desired finish.
 Chipped Paint Look- One method that I have learned to make a painted object have chipped paint is wax. I rub an old candle in between coats of paint. Randomly pick areas that you want the paint to come up. Liberally rub some wax on those areas. Paint your top coat. After the top coat has dried use a putty knife to scrape off the paint that has the wax under it. The wax allows the paint to come up easily only in
the spots applied. This would be really cool to do

in a multistep painting as well. Follow the instructions in between each coat of paint making the wax spot slightly bigger with each coat so you can see the different colors underneath. You'll love it.
Texture- When you look at an old painted item you
will often see variances and some thick paint (from years of paint

layers). Natalie at The Vintage Sparrow taught me years ago a simple tecnique to add some texture to your paint job. It is quite simply items you can find in your home. When painting an item throw on some flour, saw dust, or frankly what ever you want. This will thicken the area and add some variance to make your project look not so perfect and old! I love it and use this technique often.
Beat it!-This is very fun! Just before you are ready to glaze or antique your project you can take a hammer, chisel, chain, or . . . anything really and beat it. Randomly add some wear and tear to it.

So if you find a great table at a thrift store and it is kinda beat up, you just saved yourself a step! I will tell you that when we bought our new kitchen cabinets, which can be pricey, and my husband saw me pounding them with a hammer he did freak out a bit. But he trusted me and after glazing it really adds to the look I was going for. And my kids have contributed too, but you can't tell. Cabinet makers charge a lot to distress your cabinets this way, so why not do it yourself and save a few bucks?
 Glazing- Glaze is a product that applies a small amount of paint/stain to a project to dirty it up a bit (in a good way of course!) I have used a heavy bodied glaze from Mohawk that is linseed oil based. (You can buy this product at speciality paint stores. I got mine at Painters Supply in Mesa. So make some calls and find a store in your area that carries it.) I love how it looks. The manufacture has good directions, but essentially you apply a layer of glaze to you painted or sealed project. (If you are glazing a stained surface you need to seal it before applying glaze. If you don't the glaze will penetrate the wood and you won't be able to putt the glaze up for the desired effect.) After application you will then pull of the excess glaze with a rag just leaving behind the desired amount of glaze on the surface and letting the cracks and crevices hold on to more to show the details. Once you start doing it you won't want to stop. You will start to look for other projects to do. My friend Jenny borrowed it from me and got so addicted to glazing. And be sure to seal your project with a poly clear coat. One quart goes a long way. You could do 5 kitchens with it. It does stink so you need ventilation and you need to ALWAYS be carful when every using linseed oil. It will self combust. I have seen churches burned down because the rags were not properly disposed and they self combusted. Follow the manufactures instructions exactly when disposing the rags.
Antique- To antique something essentially means to make it look old. You want to simulate the aged look of time. Fresh paint just doesn't do it. So what I say is find your method of distressing and get your project all done. Now there is something missing. . . . yes, it looks too clean. Now it is time to grunge it up. I believe glazing is good for big jobs but when doing smaller crafts I prefer to use a simple antiquing. My preferred method of antiquing is a bottle of Delta Ceramcoat burnt umber paint, water, a brush and rags. I water my burnt umber down to a 2:1 ratio. (Two parts water for one part paint.) You don't need
very much for a medium sized project. After mixing the paint and water brush on the mixture to your project. The longer you let it sit the darker the end result. I

would say leave it on for at least 5 min and don't let it completely dry. Now with your rag rub and remove. In a circular motion you will rub in the color and remove the excess at the same time. Keep the excess in the crack, corners, and imperfections to accentuate the character of your item. Play around with it to get the desired result. If you go over it too many times it will start to pull up the color, so take it easy and enjoy the imperfection of it. I will tell you the reason I like to use this product is because it is water based and easy to fix if you mess up. If you don't like it, get a wet rag and rub it off, let it dry, and try again. If you do need to remove the antiquing be sure to clean it off within an hour. When you get what you love, seal it will a clear acrylic spray paint.
A tip to end it off:
I personally would recommend that distressing be a one man job. Many times when doing any type of distressing or faux finishing application styles vary enough that you will notice a variance from one person to another. So to make the area/project look consistent you really need to keep it to one person.
10 comments:
I am so excited about this post! These are all the methods I've been meaning to study up on because I'm getting ready to paint my kitchen/bathroom cabinets. Thank you so much for sharing. Your Blog is Awesome!
Thanks Andrea! I will try my best to do a post on painting your cabinets ASAP just for you!
thank you for sharing all the techniques, i love the look of antique!
I love this post! It will be nice when I need to come back to it for some step by step instructions! Thanks Erika!
Hey Erika.... I love your blog. Great ideas. You were always so good at everything. I've been wanting to do something with my kitchen cabinets. I hate them. You've got great ideas. I may have to pick your brain if I ever decide what I want to do.
Great indepth article on how this stuff is done. I found the crackle part fascinating. I had no idea there was a product that would actually cause paint to do this. Now every time I see crackled paint I am going to wonder whether or not it is authentic.
Please Help!
I have painted cream color cabinets. I just distressed(sanded) them today and cleaned and wiped down all cabinets. The paint on them is oil based.
I went to Sherwin Williams and got a Chocolate glaze and oil based polyurethane. I plan on glazing tomorrow. Is it ok I distressed(sanded)? Should I do something before glazing? I have never done any of this before. Please let me know.
Thanks,
Justin
Justin, you sound like you are good to go! I did distress before I painted so the distressed parts would stand out. So I think you are on the right track. The main thing the manufacture instructions may say is apply to a sealed surface, which yours is since you painted. That is just for those on raw wood that they stained. If it was not sealed it would just penetrate as though it were stain. Also If your glaze is linseed oil based have some linseed oil on hand to thin down or wipe off mistakes if you need to. Just play around with it and you will get it down. Worst case scenario you will have to repaint one door until you get your groove. When all is said and done and you love it seal it with a clear coat of paint. I just used a matte spray paint. :) Let me know how it turns out. Feel free to send pics!
Good luck
Erika,
Thanks for getting back to me. I appreciate it. Looking forward to see how this turns out and hopefully will have some pics.
I just happened to stumble upon your blog via a google search on glazing.
Thanks again!
Justin
I have an old cabinet with brass coated hardware. Some of it was missing, so I bought replica hinges. They also are brass coated, but are quite shiny! How can I age them to match the other hardware?
Post a Comment