Sunday, November 23, 2008

A key for Santa

This is a cute idea I got from Emily.  Thank you for sharing it!


Here is what she said on her post:
"If you are like me you don't have a fireplace, My son asked me the other day how Santa would come into our house... and of course I made some lame excuse, So I started thinking there has to be a poem or something about Santa getting in, I found it by doing my favorite "googling" I wanted to make it so I could hang it up every year, so I had a piece of wood and modge podge it on with cute paper, saying, and I had a key I bought from Robert Craft's a long time ago ( see I knew I could use it for something!) nailed it in a there you go, so you don't strain your eyes to much let me tell you what it says:

Santa's Magic Key
Our stocking's hang upon a wall.
We have no fireplace at all!
You see the problem is quite clear.
Santa, how will you get in here?
We heard a legend is it true?
Of magic only you can do.
We'll leave out any plain old key,
and mark it "Santa" so you can see.
Your magic makes the key fit right,
so you can get inside that night.
Thank you Santa, here's our key.
The milk and cookies are on me! "

She used Katie's tutorial to make these great boxes as well. All I can say is WOW. It is wonderful!
Here is a picture showing how the key hangs from the lid if the box.

Thanks again for sharing your creativity Emily and for pointing us toward Katie too!

Monday, November 10, 2008

Make Your Pictures Old! EASY!

I was doing a little web searching on how to make my pictures look old and found this great site.  It is a Japaneese site and it should be in English but if it is not click on English on the top right corner of the screen. Click Here to go to the site.

It is VERY EASY.  If you got on the internet today then you can do this.  :0)
Go to the site.  Choose a picture from you hard drive and click convert.  Then when you save it, it downloads it directly to your computer.  

Here is a picture I did.


I love it!  I have the perfect project I will use this tool for.  Don't worry, I will share when I get it done.
Have fun with this one!

Saturday, November 8, 2008

Magnets & Magnet Boards

Magnets and Magnet Boards are fun and easy crafts for all craft levels. They are great gifts too!

Here are some Ideas:
This Idea was sent in by Sam this is a great project to run with! These will cost you $.25 each at the most.

Click Here to download instructions


Sam gives the great idea of useing your favorite scrapbook paper, pictures of your kids, or cut outs from magazines. Allison told me that they made these and printed out quotes for the large magnets. They even did the "BE" attitudes:
Be Grateful.
Be Smart. Be Involved. Be Clean. Be True. Be Positive. Be Humble. Be Still. Be Prayerful.

Great Ideas!
The marbles are about 1" in diameter and can be found at Target, JoAnn's and I saw some at the Dollar Store. I just got some from Hobby Lobby (for those of you without a Hobby Lobby, I am sorry-They just moved into AZ so I lived without one for 14 years too long!) the marbles were $2.77 for 60! Great deal! Use a coupon and save more!
**added note: when using home printed pictures you need to be very careful. The heavy duty glue I used (E-6000) melted the pics. I recommend Mod Podging (a staple in every crafters home) the pic on the marble and then use the heavy glue for the magnet. Even with mod podge for printing out pics on a home photo printer it may not work. Good luck!

These cute wooden magnets that Deana sent in--VERY EASY!

You can just buy your favorite wooden cut out shapes at your local craft store. Glue on some scrapbook paper of your choice. Distress it a little with some distress ink and then you can seal it with some Modge Podge. Add embellishments to your liking and then finish it off by gluing on a strong magnet.


Check out these ideas: These were made from the pre cut galvanized sheet metal from Home Depot and Lowes.


Here are some great ideas for magnet boards. This is something very easy that you can personalize and make it your own.


Galvanized sheet metal is not easy to cut so ideally you want to find the perfect size precut for your project. The frame above is the large piece (3' x 4') that you can get at home depot. They then built the frame out of 1 x 2 mitered and stapled together. And then glued the metal on with liquid nails.


This is a small piece of metal that you can also find at Home Depot for under a $1. It measures 8" x 12".
You can paint with Chalk Board Paint to make it a chalk board and magnet board.
At Lowes I found tint-able chalkboard paint if you want something other than black.
Chalk board paint goes a long way so this is a fun group project.
I also found a 5 pack of 5 x 7 pieces of metal for under $3. They are great for small projects. Let your imagination run with that one! Then share with us what you create!
At Lowes at the end of the hardware isle you can find mulitple sizes and gauge of sheet metal to suit your individual project.


If you don't like the "tin look" you can mod podge some of your favorite scrapbook paper on the metal. Find a frame or miter some molding and make your own frame. For lager tin find some cute wrapping paper.

Adding Ribboin and gluing on some quotes or scriptures is another great idea.


We are making some of these frames this month for our craft day. They found these 16 x 20 frames at Michael's ready to paint to your liking. The metal they had to have cut spacifically to size so they found a sheet metal shop that would cut the metal to size. Sometimes if you are doing a couple of boards they can just use scrap and do it for pretty cheap.

If you are in the Mesa area you can contact Casey Jackson at JPF Metal Works near Country Club and Broadway (480-430-3912) for specialty sizes metal for magnet boards and anything else for that matter. He pretty much does "anything metal" at a great price.

More Great Ideas**
Allison went a step further and used the large sheets of galvanized sheet metal to personalize her teen-age daughter's room by making a bullitin board and head board by directly nailing them to the wall.


She also mentions that you can use the cute brads from the scrapbooking isle as some cute magnets. She just cuts off the brad part and glues on the magnet.

Monday, November 3, 2008

Great Fall Decorating Ideas & Crafts

We have some cute ideas for fall decorating. Thank You to all of you who contributed your ideas.
Diannah Made these cute fabric pumpkins out of a circle of scrap fabric. She gathered the circle where the stump is. For the stump she used some fabric that she just sewed like a mini pillow case and tucked under the edges then she hand sewed on the top. For a finishing touch she used raffia and coated floral wire that she curled around a pencil.

She made hers pretty small, but you can do any size.


Diannah is an accomplished quilter and also did the pictures and wall quilt. If you are into quilting these are some great ideas!


Holly also had some cute fabric pumpkins on her blog. You can Click Here to see the instructions. (you'll love her cute little people too!)


Diannah also made these cute letter signs. The are so great for anything!
For these signs she used 1/2" MDF cut into 12" squares and used mod podge to glue on the trimmed down scrapbook paper. For the letters she enlarged a cute CK font that looks like pumpkins and traced out the letters and cut them out with her Scroll Saw After a light sanding to get the rough edges off she painted them and accented them with the black lines. I would use a painters pen or freehand with a brush and craft paint. (Sharpies tend to fade over time). To finish it off she used the
coated floral wire to make the curly Qs and then you can glue or nail on the letters.
Really Cute!

These are some fabulous pumpkins that April made. April is also an accomplished quilter and even has the sweet sewing machine that adds cute little touches like the embroidered leaves. Her pumpkins are more pieced together and have a lot more detail to them. I love how she added the bling, flowers, and misc. tassels to her pumpkins. They turned out so fabulous that she is even selling them now. Click Here to check out her etsy shop if you are interested in buying some.

Allison is the Fall Decorating Queen in my book. You can tell it is her favorite time of year to decorate. Many people pay her to come decorate their porches and house every year for fall. I appreciate her sharing some of her cute ideas with us on this blog to spread the creativity! If these next few pictures you can see what a great eye she has for arranging and the finishing touches.
The wagon is so fun and whimsical filled with Pumpkins, leaves and gourds.
One scarecrow is cute, but five is even cuter! (Notice she used an odd amount-that is the "odds" rule in decorating. You should always use odd numbers of what you are decorating with.) The hay and pumpkins, and leaves just look so perfect with this scarecrow family!


This display is perfectly placed just at the home's entry to greet the guests!


Many have these beautiful urns at their entry. Here a great example of how you can dress them up for any holiday. The leaf and berry pick are easy to dress this planter up.

Another great way to spruce up your entry at fall is with a pumpkin topiary.
For directions on how to make your own topiary Click Here.


Here are some more great ideas for decorations and crafts:
These letters are something Teresa made from some scrap 2 x 6 pine. After finding and tracing the font she liked she cut it out with her Scroll Saw. Finish off with a light sanding and some paint. The thicker wood makes the letters stand up with out falling down to easy.
This cute arrangement is accented with the vinyl letter sign that says "Autumn-Give of Yourself and You Will Reap a Great Harvest" and this rough post pumpkin. You can find rough posts at Lowes. With a 12" Miter Saw.you can cut it to various heights to make the pumpkins. The stem is just a thick branch cut to about 1 1/2" and accented with silk ivy, berries, and curly Qs. These make a great gift.

Tuesday, October 14, 2008

Halloween Crafts

Here are some really cute ideas sent in by Camille. They are really fun for Halloween.

The Halloween Countdown

This is a craft she did that turned out so cute.  They got the idea from Holiday Home Magazine on page 24. They changed it a little. It is magnetic and is a cookie sheet from the dollar store, painted and aged. The calendar grid and countdown header are glued on paper. Really fun! Each of the numbers are something different from around the house with a magnet glued on the back. 

Black Cat Head

The cat in the same picture she made out of paper mache with the instant stuff. It is much easier to work with and so much better. The only down side to the instant paper mache seems to be the extremely long drying time.


Happy Halloween Banner

The banner is just paper and then laminated and stapled onto ribbon.

Super Easy!


Spooky Letters
The letter are just wood with scrapbook paper Mod Podged on them.  You can find letters at your local craft store or cut your own out with some 1" wood (pine) and a scroll saw.  I pick a font that I like and then copy it on to the wood with carbon paper.  

Wooden Pumpkins

These pumpkins are essentially three pieces of wood that are cut in the shape of an arch.  Place all pieces together and trace out the mouth.  Cut out mouth hole.  Cut out two leaves and some thin eyebrows.  Paint all pieces accordingly.  Let dry.  Distress with a light sanding.  Antique pieces (I like to use watered down burnt umber-Delta Ceramcoat).  To assemble you can use some thin scrap wood behind the three pieces to secure together with staples or nails and some wood glue.  Glue on eyebrows and leaves with wood glue.  Paint on the eyes and nose.

Thank you Camille for all of these great ideas!

Wednesday, October 8, 2008

Cornices

Traci & Teresa sent me the idea of making your own cornice.  They have made quite a few over the years and got the idea from Family Handyman Magazine.  You can find the article by Clicking Here!

Here are some of their finished projects:


Here is a detail of the black cornice.

Monday, October 6, 2008

Tools to tinker with!

I wanted to share with you my opinion of what tools every project-doin' woman needs.
Here is a list of tools I could not live without!

Scroll Saw
Compound Miter Saw
If you plan on doing a lot of larger trim work you will want to invest in a 
12" compound miter saw.
Jig Saw
Brad Nailer/Staple Gun (with a range of 1"-2" Brads) & Air Compressor

A good drill
Cordless drills give you a little more freedom, but you do have to worry about batteries and charging them.
Corded drills are more powerful, but you have the cord to worry about.

Sander (small like a palm sander or mouse sander)
I like the mouse sander because the design makes it easy to get into corners.
Router
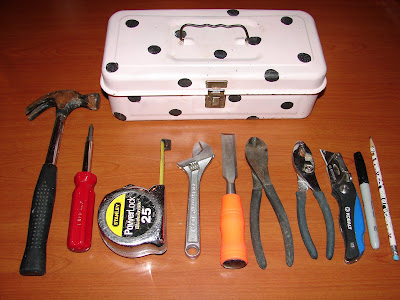
Tool Box Tools:  (in order appearance)
Hammer, 4 in 1 screwdriver (has 2 sizes of each head, flat & phillips), tape measure, crescent wrench, chisel, wire cutters, pliers, all purpose razor blade knife, sharpie, and pencil.
That's a good start for acquiring tools.  For us it was a slow process.  One tool here and there whenever we has some extra money.  Also we took advantage of Harbor Freight Tools.  Very low priced tools that got the job done.  The funny thing about starting your tool collection is that when ever I give a tool to my husband for Fathers Day, Bdays, or Christmas I think he wonders if his gift is for me or him!

Tuesday, September 30, 2008

Build your own Scarecrow

Here are some cute scarecrow ideas:
This is from my friend Natalie-she is so talented and I ALWAYS love everything she does!  Isn't this guy great!  The wooden head is so cute and the whole ensemble is Fabulous!  I love the garden tools, corn stalks and boots!  Thanks for sharing!
The sign is a cute cabinet door that says "Howdy".  This guy's nose is a corn cob.  I love the gloves, the crow on the hat and the  uniqueness of the vest!  All the raffia adds a lot!
Such a great welcome to greet anyone who comes.  All of the flowers and pumpkins on the hay really fill up the space.
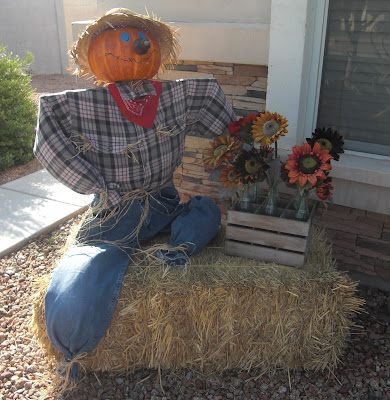
He has such a fun casual look with his leg up on the hay.  And the sunflowers in the coke bottle case is so creative.  Another great welcome for guests!

Allison, a friend of mine is the Queen of Fall Decorating, when she gets her scarecrow done I will put it on this post, so check back.

You've seen some great ideas so now here's the basic idea to build your own scarecrow.  There are a lot of variations that you can do to personalize your scarecrow, so just use this as your base idea.  

Find some old clothes in your closet or at a thrift store and you will need a 2 x 2 stake and some 1 x 2 wood for the arms.

Screw in the stick that would be the arm to the 2 x 2. Decide Height based upon if you want a standing or sitting scare crow. Add about 18"-24" to be stuck in the ground/hay.

Place the pants in the right place and stuffed with plastic bags. (If the scarecrow is standing place the 2 X 2 post through one of the legs.)

Pound the 2 x 2 main stick into the ground/hay. 

Put on the shirt and stuff it with plastic bags pinning the shirt to the pants. Add other clothing at this time if desired. (I braded some jute to make a tie belt.)


Put the head on (the head is a foam pumpkin that I cut a square hole in the bottom, the hole is slightly smaller than the 2 x 2 so it fits snug) 
Paint the face how you desire.  There are some good ideas on this post if you like any of those.
I just used a black painters pen and some buttons for the eyes.  Others have used acrylic craft paint.
Then I used a foam squash for the nose and secured with wire. 
After the head was on I used some raffia for some sweet chest hair.

With Jute I tied off the feet and arms. You can stick raffia in those too if you want.

Make or buy a cute sign to hang from his neck.

For the hair I tied some raffia together to fashion a wig.

Then I put on the hat -With a sturdy piece of wire I poked through the hat and the hair to secure on his head. Bend a piece of the wire 90 degrees to secure the hat

My finished fall porch this year.  My chrysanthemums haven't bloomed yet, but they will still be nothing like 4 years ago.  They were phenomenal!  Also after my kids pick out their pumpkins we put them all around the scarecrow to help fill the space.

**Tip- watch for end of the season sales for next year.  Every year you can add a little bit more!