Sunday, April 22, 2018

Locker Restoration

I found these lockers a few years back when on a road trip antiquing.  They were and a pretty beat up barn and very rusty.  Now, I love rusty and shabby, and we used these lockers "as is" for many years in the garage.  I wanted to clean them up a bit and paint them to continue to use in the garage.  The previous paint job had covered the original label and I was hoping I could restore that as well. 
Hope you enjoy the restoration process as much as I did. 
Not much luck in researching lockers, but these lockers are from the Berger Mfg, Republic Steel Co in Canton, OH.  Best guess from the old Yale locks in place that they are from the 1930/40s.
 The perfect spot in the garage. 
Time to clean up.  
As with any restoration project the first part is the worst.  I want instant gratification and to just start spray paining.  But no.  I had to get all the prep work done.  Cleaning, vacuuming, and stripping some of the old paint off. (I wasn't too bent up on getting them stripped down to bare bone, because I do want to keep some of the shabby properties.  Also the rust was pretty thick, so I am embracing the shabby destiny of these lockers.)
 I was thrilled to see how easily the paint came off the labels and restored their original look without damaging the original paint.  I love the rusted look of the brad/rivets holding the label as well. 

A new pallet! 
You can see there was a pretty significant amount of rust and also you can appreciate the original gray color. 
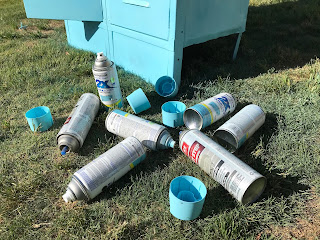
Now it's time to let the paint SPRAY!!!!
I use the Rustolium Satin Aqua for the exterior and Ace Rust Stop Stone Gray Satin for the interior and bottom.
 I fashioned a pice of wood that I could use to block off overspray of the exterior.  I made the height tall enough to overlap the edge and the sides were a few inches short (to actually get it in the locker) and moved it side to side when spraying.  I drilled a hole in each corner and used some scrap rope to hold the wood in place.  Did not want to have to worry about taping every locker off. Smarter, not harder.  :)
The sky was bluer that day.....
--My only complaint with the Rustolium paint was that some cans would not spray evenly, no matter how long I shook the can.  The first few minutes of spraying would have spots of darker color.  Go figure. 

Step by step image of the transformation:
The gray interior was painted first and left to dry.  It locks were removed and the labels were taped off and fist to size with an exacto knife.  Note the green scrapbook paper that I taped on each door to prevent overspray at the lock hole and vents.  Painters tape and moving it to each door as I sprayed minimized the touch up later on. 

Antiquing: To antique I use the Kryolon Wax Coating Chalky Finish, Dark brown.  Thinly sprayed in directly on the lockers and wiped it down with a clean white cotton cloth. A little paint thinner was used in the end to clean up thicker areas if needed.  
 I enlisted the help of my mechanically minded son to help re-install the locks.  A couple of the locks were permanently in the locked position and those doors would not close all the way. We decided to remove all the locks rather than tape them and then after fixing the 2, we reinstalled them and it was nice to have the rusty screws and locks. I have 8 of the original knobs that were also replaced, now I will just have to find similar replacements for the top 2 lockers. Love how they turned out and the function they bring to the garage.
A little cleaner storage area and a clear rubber shelf liner was added. 


Saturday, April 15, 2017

Laundry Room Makeover

One of the first things I wanted to get started with was the laundry room.  We could do this fairly affordable and just took some elbow grease.  Also it was a great place to practice. :)
Before
After
A Starting point:
Here's where we started.  Oak cabinets that couldn't fit the detergent bottles and the wasted upper space.  The sink cabinet was a 36" cabinet with little counter space. We got a new washer and dryer when we first moved in and brought in our pantry fridge. 
New Cabinets
Found the sink base at a scrapbook store "going out of business" sale for $20.  Since I had all the extra Ikea wood (see below) I used it to build the shelves for the baskets. I had the drawer base from an old remodel, but it needed some tweaking since it was a little smaller than the other cabinets. These were all white melamine. This configuration gave me more counter space and a little counter between the sink and the dryer. 
The upper cabinets were raised to the ceiling and a 12" shelf was added all the way across.  I painted them and the new shelf a gray color.   I didn't want to even bother with painting the oak cabinet doors, so I just left them off.  The wall color is Valspar Quiet Mint (5003-1A). $30
Tile backsplash, Shelves and some misc hardware (Ikea) $100
Faucet was the most expensive item $120
Countertop
I had this idea to see what Ikea would have for countertops, and I even thought, Maybe there will be a countertop in the AS IS section.  It was my surprise that they ACTUALLY had a butcher block counter top, but you had to buy the WHOLE cart of wood.  FOR $10!!! yes, ten dollars!  So now we had extra wood for other projects too. 
 As you can see there was only one hole in the countertop where I would be cutting for the sink anyway.  The bottom side had no discoloration and would be a great top! 
 With some walnut stain and a few coats of Waterlox, which was the majority of the cost for the countertop, I had a beautiful counter for the laundry room $50

Finishing Touches:
I made some support braces with some scrap 2x10s and plywood for a decorative look similar to some vintage braces that are a fortune.  Now when I was cutting these scrolls on my scroll saw I was yelling at myself in my head saying, "IT'S JUST A LAUNDRY ROOM", but the challenge was met and I got some good practice to do nicer ones down the road. 
I used the shelves for old milk baskets to store dirty rags.  I like to keep my dishtowels separate from the cleaning rags so each basket is for its respective towels. 
Ladder for hanging and ikea hardware for storage.  See below for the ladder. 
 I used some fabric I had lying around to make curtains.  Tension rods are used to hang the curtains. 
Hobby lobby basket on left for the lonely socks and and old tin from an antique store the perfectly fits the dryer sheets. 
Another glimpse of the finished product. 
**********
Laundry Room Hacks
Decorative Camouflage:

This old pot was the perfect size for the Costco sized Oxy Clean detergent.
 Shelf Protector:

A $3 tray from Lowes.  I used a hack saw to cut the edges then used a Bic lighter to soften the plastic as I bent the tray slowly.  This protects the counter from the corrosive effects of the detergent and catches any drips.  I still had to educate my kids to not put the cap back on the detergent without rinsing it out or just throwing it in the wash.  We do keep old caps to have extra and there is enough room to store them on the side of the detergent. 
I had some scrap pegboard to use for the backing of the shelf area.  I can now use peg baskets to store stuff and extra hooks to dry hats. 
 Make your own ladder with salvage wood:

I had been shopping around for an old ladder to hang in the laundry room, but I did not want to pay that much.  I did have some scrap wood that would do the trick.  I had to carefully measure out the area for the 5 rungs and used a spade bit to sink the rungs 1/2" into the 2x4.  I predrilled the holes for the screws and used washers with the screws to fix the rungs.  A distressed coat of paint later, wa la! A free ladder. I used some hooks and some heavy duty jute to hang the ladder.  I did staple the jute after I tied it to the last rungs to keep it in place.  


Chalkboard Laundry Reminder:
I used an old plastic frame that was spray painted to make into a chalk board for the door. 
The 3M velcro hooks are perfect for the door.  No damage, and with a light frame it holds perfectly. Here is the finished product of my Laundry Day sign: 

In our home, start doing their own laundry when they are 10.

Hooks for this and that, including Ironing board storage:

 And here is a real glimpse of our laundry room, except we usually have bras hanging from the hooks too. :) keeping it real!

Monday, April 3, 2017

Curb Appeal!

We moved in in April 2016, so by the time we got to the curb appeal it was in the throws of summer in AZ.  
We first wanted to focus on the landscaping.   Here is where we started.  Anyone who knows me knows I like green grass, flowering shrubs, trees and.... not brown.  So we had a lot to do.

MLS pic before we moved in. 
When we first moved in I needed some encouragement for what's to come, so I had my painters paint the door red!  It was the perfect color of red! (Benjamin Moore, Raspberry Truffle)
After we were all settles my SIL had replaced her old Lowes coach lights and gave them to me.  They were faded and did have some cracks, but all in all she gave me 5 coach lights and 2 post lights.  
I got ambitious and painted them with a flat black and turned one of them into a pendant light for the front porch.  I love how they turned out and how chunky they are. 

LANDSCAPING!!! AHHHHH!
We had a good rainstorm after we moved in so we monopolized on the soft ground and pulled all of the plants out with our car.

The next step was gravel.  I hate gravel! If you look at these pics you may be deceived to think that the ground was mounted to give the variance in rock.  It was ALL ROCK!  So much rock, 20 tons to be exact.  My husband invested in a dump trailer, which saved us.  But if you know how much it costs to dump rock, you would think twice about putting 20 tons of rock in your front yard.  Most people would not put 20 tons of rock in the front yard.  We just hit the jackpot!
Many days and bobcat rentals later we had a clean slate:
Happy 4th of July! 
We did discover that the insane heat in AZ is useful to pull paint off the concrete.  After the bobcat had scraped the sidewalk the paint started peeling off like sunburned skin!  My daughter got addicted and pulled it all of the sidewalk.  Tender mercy. :) 

The rocks were removed and the sidewalk was removed.  This side yard had a large yucca and multiple barrel cacti growing right up next to the house.  Now ready for a driveway extension. 
The front yard was cleared and prepped for irrigation.  In the past we had used the pop up sprinklers, but my husband had been looking in to subterranean irrigation through Rain Bird.  After evaluating the pros and cons, we had decided the subterranean irrigation was what we wanted.  

all of the trenches dug and ready for the copper colored line
For curbing we decided on brick and did pay someone to do that.  Our concrete guys were more than willing to do it, and frankly I was burnt out by this point.
 Sod laying day! Now this is rewarding to see GREEN! my heart sang that day! Great way to put the kids to work.

A light post was added and flowers were planted.  Not much grows well in the summer here so I opted for vincas, which are not my favorite.  I decided to throw down some zinnia seeds for the heck of it and just hoped for the best.
Autumn was in the air and I was so excited to decorate, but then the itch to paint came...


We now were ready for the pièce de résistance! PAINT!! I wanted yellow, but subtle! You can get too lemony real fast if you aren't careful.  I found a color in the tan range of yellow, which gave it a subtle but fresh look.  I just could not do brown any longer! Here are the colors I worked with...
The outcome was just what I wanted and completed the transformation! WA-LA!
After (top)/Before (bottom)
The last touch was to replace the gate:


A highlight to my endeavors was the flowers that sprang up unexpectedly.  Not only did they grow nicely, but they were HUGE.  Even months later they keep on giving.  I have propagated more seeds hoping to have flowers all summer long.  Zinnias do great in the AZ summer! 
We still haven't filled in the gravel on the borders, but we are currently working on the back yard and HATE gravel.  I would love to find a better alternative.