Tuesday, September 30, 2008

Build your own Scarecrow

Here are some cute scarecrow ideas:
This is from my friend Natalie-she is so talented and I ALWAYS love everything she does!  Isn't this guy great!  The wooden head is so cute and the whole ensemble is Fabulous!  I love the garden tools, corn stalks and boots!  Thanks for sharing!
The sign is a cute cabinet door that says "Howdy".  This guy's nose is a corn cob.  I love the gloves, the crow on the hat and the  uniqueness of the vest!  All the raffia adds a lot!
Such a great welcome to greet anyone who comes.  All of the flowers and pumpkins on the hay really fill up the space.
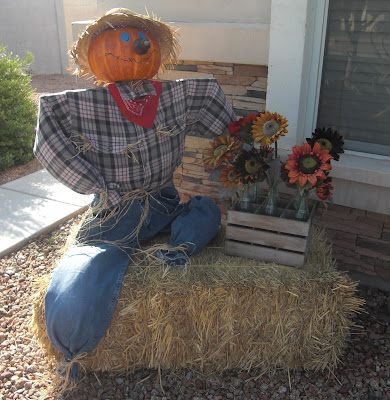
He has such a fun casual look with his leg up on the hay.  And the sunflowers in the coke bottle case is so creative.  Another great welcome for guests!

Allison, a friend of mine is the Queen of Fall Decorating, when she gets her scarecrow done I will put it on this post, so check back.

You've seen some great ideas so now here's the basic idea to build your own scarecrow.  There are a lot of variations that you can do to personalize your scarecrow, so just use this as your base idea.  

Find some old clothes in your closet or at a thrift store and you will need a 2 x 2 stake and some 1 x 2 wood for the arms.

Screw in the stick that would be the arm to the 2 x 2. Decide Height based upon if you want a standing or sitting scare crow. Add about 18"-24" to be stuck in the ground/hay.

Place the pants in the right place and stuffed with plastic bags. (If the scarecrow is standing place the 2 X 2 post through one of the legs.)

Pound the 2 x 2 main stick into the ground/hay. 

Put on the shirt and stuff it with plastic bags pinning the shirt to the pants. Add other clothing at this time if desired. (I braded some jute to make a tie belt.)


Put the head on (the head is a foam pumpkin that I cut a square hole in the bottom, the hole is slightly smaller than the 2 x 2 so it fits snug) 
Paint the face how you desire.  There are some good ideas on this post if you like any of those.
I just used a black painters pen and some buttons for the eyes.  Others have used acrylic craft paint.
Then I used a foam squash for the nose and secured with wire. 
After the head was on I used some raffia for some sweet chest hair.

With Jute I tied off the feet and arms. You can stick raffia in those too if you want.

Make or buy a cute sign to hang from his neck.

For the hair I tied some raffia together to fashion a wig.

Then I put on the hat -With a sturdy piece of wire I poked through the hat and the hair to secure on his head. Bend a piece of the wire 90 degrees to secure the hat

My finished fall porch this year.  My chrysanthemums haven't bloomed yet, but they will still be nothing like 4 years ago.  They were phenomenal!  Also after my kids pick out their pumpkins we put them all around the scarecrow to help fill the space.

**Tip- watch for end of the season sales for next year.  Every year you can add a little bit more!
Sunday, September 28, 2008

A little inspiration

create |krēˈāt|
verb [ trans. ]
bring (something) into existence :

creative |krēˈātiv|
adjective
relating to or involving the imagination or original ideas, esp. in the production of an artistic work : change unleashes people's creative energy | creative writing.
• (of a person) having good imagination or original ideas


I attended a woman’s conference yesterday and had the privilege of listening to this fabulous talk by Dieter F. Uchtorf. I loved this talk and wanted to share with you the section on creating. I was so touched that I felt it very appropriate to share it with all of you on this blog. 

“The desire to create is one of the deepest yearnings of the human soul. No matter our talents, education, backgrounds, or abilities, we each have an inherent wish to create something that did not exist before. Everyone can create. You don’t need money, position, or influence in order to create something of substance or beauty. Creation brings deep satisfaction and fulfillment. We develop ourselves and others when we take unorganized matter into our hands and mold it into something of beauty.”

“You might say, I’m not the creative type . . . If that is how you feel, think again, and remember that you are spirit daughters of the most creative being in the universe. Isn’t it remarkable to think that your very spirits are fashioned by an endlessly creative and eternally compassionate God? Think about it. Your spirit body is a masterpiece. Created with the beauty, function, and capacity beyond imagination. But to what end were we created? We were created with the express purpose and potential of experiencing the fullness of joy. Our birthright and the purpose of our great journey on this Earth is to seek and experience eternal happiness. One of the ways we find this is by creating things. If you are a mother, you participate with God in his work of creation. Not only by providing physical bodies for you children, but also by teaching and nurturing them . . .”

“You may think you don’t have talents, but that is a false assumption. For we all have talents and gifts, every one of us. The bounds of creativity extends far beyond the limits of a canvas or a sheet of paper and do not require a brush a pen or the keys of a piano. Creation means bringing into existence something that did not exist before; colorful gardens, harmonious homes, family memories, flowing laughter. What you create doesn’t have to be perfect . . . Don’t let fear of failure discourage you. Don’t let the voice of critics paralyze you. Whether their voice comes from the inside or the outside. If you still feel incapable of creating start small; try to see how many smiles you can create, write a letter of appreciation, learn a new skill, identify a space and beautify it.”

“Nearly a century and a half ago President Brigham Young spoke to the saints of his day. “There’s a great work for the Saints to do”, he said. “Make beautiful everything around you. Cultivate the earth and cultivate your minds. Build cities, adorn your habitations, make gardens, orchards, and vineyards and make the Earth so blessed that when you look upon your labors you may do so with pleasure and that angles may delight to come visit your beautiful locations. And in the mean time continually seek to adorn your minds with all the graces of the spirit of Christ”

“The more you trust and rely upon the spirit the greater your capacity to create.”

The whole talk is fabulous! If you want to read the whole thing I will attach a link when the talk is published. Until then you can Click Here to listen to the talk.  At the bottom of the picture you can select Dieter F Uchdorf's talk.

I hope you enjoy it as much as I have.


Saturday, September 27, 2008

The Best Place To Buy Furniture!

One of my close friends decided quite a few years back that she wanted to start a furniture business. Her mission-To make furniture affordable. She started out of her home and eventually moved to a small warehouse space and has a great business. Many have found the store through referrals, others just stumbled across it, but the result is great furniture at an amazing price!
Here is how it all started:
Photobucket

Cortate Furniture

Is now located in Gilbert AZ on the southwest corner of Gudalupe and Recker.

The store hours are:
Wednesday & Friday--12 noon to 6 p.m.
Saturday--10 a.m. to 4 p.m.


The set up of the store is that you can go in look through catalogues and then Hope will give you the price on the spot. To save you some time I recommend you do some homework and research some of the vendors online you can click on the name and it will link you to their website.


When you find what you might be interested in write down:
  • the manufacture name

  • furniture description, including color, name of collection, or specific item.

  • item number.
Here are her vendors that have websites that you can preview from the comfort of your own home: (Click the company name to go directly to their website)

Acme -all types of furniture, not a huge selection, great prices
AICO-Michael Amini Furniture -high end furniture for all rooms! Moderate to high priced.
Aspen Home -moderatel to high priced fruniture depending on the collection, wide variety
Best Chairs -good selection of all types of chairs, some sofas and occasional tables, great prices
Bramble -custom furniture 16-20 week lead time, moderately priced
Butler Specialty Furniture -well priced good quality case goods
Coaster -all types of furniture, not a huge selection, great prices 
Emerald -all types of furniture, not a huge selection
Flexsteel -upholstered goods
Good Trading Co. -kids furniture, mostly known for well priced bunk beds
Hacienda Leather -custom leather sofas, many leathers to choose from, good prices on sectionals
Home Elegance -wide variety of furniture, well priced, comes quickly if in stock
Intercon Furniture -Case goods for all rooms, moderately priced.
Kincaide Furniture -known for solid wood construction, upper end furniture at a moderate to high price
Lea Furniture -great variety of kids furniture
Magnussen -bedroom, dining room and occasional, good prices
New Dimension Sofa Factory -good selection and flexibility with fabric and style for upholstered goods. Great priced.
North American Wood -good selection wood furniture. Dining, occasional, office, and bedroom furniture. Great priced.
Parker House -largely and entertainment line, known for expandable consoles
Robert Michael -custom sofas, good warranties, allow 4-6 weeks for delivery
Samuel Laurence -case goods, great kids line, good prices
Stanley -high quality beautiful furniture, higher priced
Vaughan Bassett -predominately bedroom with some dining, well priced
Winners Only -wide variety of case goods, great prices, good quality

The other vendors she carries that are not viewable on the web are:
  • Custom Sofas-can have as many as 14 fabrics on a sofa
  • Custom Case goods (12 colors to choose from)
  • As well as several other case good companies
So you will just need to go down and look through the catalogues for those companies

Also if you are ordering custom furniture that is upholstered you need to take time to look through the fabric swatches.


Now keep in mind, you will get your furniture fast. Some companies take longer, especially when ordering couches and other custom furniture.  Cortate is family owned operated. You get a good deal on furniture because they keep their overhead down. That means they don't have a ton of storage space. Be prepared to pick up your furniture within 24 hours of the arrival date if not the same day. You will be responsible for picking it up yourself-they do not have a delivery service. When you order they will give you an estimate on arrival, but they are not staffed to call and give updates. They are some of the nicest people you will meet and if you are willing to save money you will love buying your furniture there.

**Updated 6/13

Wednesday, September 24, 2008

A little trim to top it off!

Trim in a home is the icing on a cake to me! It is a great added touch to any home. If you are a fan of the traditional look-then you love moulding too.

I grew up in Denver. My grandparents had this beautiful old 1920s Denver Block Style home. I loved the moulding in it. By the time I was sixteen my grandparents had moved out of their home but the memories of their beautiful home still influence me today. Look at that timeless trim. . . . (look past the sweet 80s hair-do and see the beautiful paneling in the dining room)


Many of the trim projects in my home, even in my friend's homes, have been inspired by my Grandmother's home.

These pictures are of Teresa's door topper-we went a step further and made her topper a shelf patterned after the the plate shelf in my grandmother's dining room. She does a great job decorating it for the seasons.

After we moved into our current home, one of our neighbors went to town on the trim in their home. I was so impressed. It looked very hard and intimidating. I asked him how it was done and wa-la! I figured it out, it wasn't as hard as it looked. One of my friends also learned how easy it was from him and now she even has her own trim business. So hopefully after reading these different projects you can feel confident about doing your own trim work.

There are different materials that you can use.
  • MDF (medium density fiberboard) is widely used because the cost is the least of the products, it is easier to work with-doesn't warp, and it comes pre-primed in many varieties.
  • Wood moulding comes in many different varieties. You'll notice the harder the wood, the more expensive it get. I like to use wood moulding in higher traffic areas, such as door ways and chair rail. The MDF is easier to damage so wood works out better in high traffic areas, in my opinion. The least expensive option for wood moulding is to buy it finger jointed. FJ moulding is pieced together. So every 18-24" you will see a joint where the wood was pieced together. If you are painting the moulding anyway FJ is a good less expensive way to go.
  • Foam & PVC mouldings are another option. I personally have not used any foam moulding. It can be a little pricy and you need to glue it on. If you are interested in doing foam I would reccomend you research it to see if it will suit your needs.
  • Flexible moulding is definately pricey but if you are doing a curved wall or area the price is worth it. Outwater sells it, they are a great company to use (I love all the fun stuff they sell).
  • Decorative moulding is VERY pricy, but so beautiful. If you are on a budget you can use this moulding as accents just to give that extra detail but not break your budget.
So I want to walk you through some trim ideas to do in your own home. I will include seperate posts for different moulding projects. Each project will have their own download-able instruction sheet. For a shortcut to all of the trim projects just click on the moulding lable in the side bar to access all projects. As I get more done on the blog you will be able to click on the project below and I will link it to the post.

The different projects will include:
Baseboards

Window casing

Window Sills

Toppers (windows & doors)

Crown Moulding
(pre caulk & putty)

Wainscoting

Decorative Touches

Now remember the trim job doesn't end when the trim is on the wall--Now you have to caulk, putty, and paint. I really do not enjoy that part.

So if you don't have a friend like Teresa (who is always willing to help with my crazy ideas-notice our "don't get caulky" T shirts) and you are going to hire help for any part of your trim project I would reccomned a good painter to do all three! If that is not in your budget follow these tips:
  • Invest in a caulking gun. They are inexpensive and worth it!
  • Cut the tip off the caulk (at an angle) only as big as you need-if you cut it too big you end up with too much waste
  • Apply the caulk where needed
  • Cover you finger with a damp small cloth and smooth the caulk into the seam. Wipe off any excess. (It the area you are caulking has a large gap you may have to go back over it after it dries-caulk tends to shrink)
  • Rinse off your rag when it gets too caulky!
To putty I just apply with my finger. You want to over fill the hole so you can sand it smooth after it has dried. (I also prime the putty if the trim is already primed to avoid any bleeding through the paint)

Keep in mind your style while looking for trim accents for your home. Take pictures of things you like, watch for ideas in your magazines, and keep your eyes open. Your home is YOUR haven. When you start getting into finishing touches on your home remember it is for you, not your guests. You should love to be in your home and it should reflect YOU, just worry about being comfortable in your own home, you're the one there day in and day out!


So good luck and as always, please share any great trim projects you have done with the rest of us too!

Wednesday, September 10, 2008

Calling All Fall Crafts!


Fall is officially 11 days away! Yes, it is time to get going with the fall crafts. Being the practical person I am, I love fall decorating because you can keep it up 2 months and then some, if you start early! Being in Arizona I almost feel like maybe if I decorate for fall it may start to feel like fall--COOLER!

Halloween Sign


Here is a craft that Deana sent me.

The great thing about this craft is you can really put anything you want on it!
If you just wanted to make it fall exclusive you could put "Autumn, Harvest, Family" To make it Christmas you could put "Peace, Joy, Love" or for spring you could put different flower names.
I am just throwing out ideas here but let us know if you have other ideas for sayings too!

So let your imagination run wild!


Click Here for the instruction on how to make the signs

**please note, the estimated cost for this craft listed on the instructions is before vinyl. Vinyl can rang anywhere from $4.00-$8.00


Gratitude Jar


This is a craft we did last year that my friend Jenny designed. She is an exceptional scrapbook/card maker and we can alway count on her for great designs! It is a great craft for Thanksgiving. We encourage our kids to put something they are grateful for during the month of November up to Thanksgiving. Then on Thanksgiving we all read to each other what we are grateful for. They are anonymous (even though the writing gives it away) and can be quite funny. We tell the kids to think of ANYTHING that they are grateful for that day. My husband and I even write something in for the little children who cannot write.

Click Here for instructions on Gratitude Jars

Idea Book

I am a copier! When I see a good idea I am pretty good at copying it and putting my own little twist on it. So I do enjoy searching for ideas. A prime example of this is the idea of an idea book. A friend gave me this idea and I ran with it.
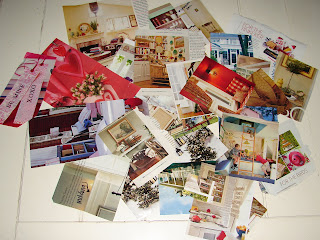
Does this look Familiar?
Do your magazines pile up and you can't throw them away because to there are a couple of pages of cute ideas?

If you answered yes go through your magazines now and just rip out the pages that have your ideas.
Now throw those magazines in the recycle (go green right?) and liberate yourself from those old magazines!

Now that pile of magazines should look like this.

If you are really motivated divide your piles into sections, ex. garden ideas, craft ideas, architectural features, decorating ideas, furniture, house ideas . . . what ever you like!

Now this is to simplify, so make it easy on yourself. Don't go all "scrapbook" on this project. Just make it functional!

Now you are ready! Get a binder (about 2"), some page protectors and some old card stock that you never used and throw it all together.

This is now your base for projects you would love to do! It is so fulfilling to look through your idea book and see what you accomplished. If you enjoy patting yourself on the back, put a picture of your finished project in your book next to your idea. And then share your project with us on this blog!


My son and I made this video for a Church Spring Cleaning Activity! Very Cheesy, but aren't all infomercials?

Monday, September 8, 2008

What to Expect!

Here is what I am planning on putting on this blog in the next month:

Old Cabinet door Ideas
Paint or Not to Paint-Kitchen Cabinets?
trim & molding tips/ideas
Craft Ideas (Christmas, Fall, Halloween. . .)
Fall porch decorations
Old window Ideas
Tools-what you need!
Idea Book
Temple Pictures
Making a decorative shelf

And that's just the beginning! And please let me know if you have any requests or other ideas!

Sunday, September 7, 2008

What Time Is It????

Clocks! No, not the song by Coldplay, but a favorite 'timeless' craft. About 6-7 years ago a friend taught me that anything could be a clock. So while getting ready to scrap my old 3 legged table from my youth I thought this would be a great clock! So then it was born, I became a CLOCK JUNKY. So this is my first clock I made.

The next thing we knew this became a favorite for Super Saturday Craft Days. I even made up some stencils to help the process.

But today it is a little harder. You cannot find the particle board rounds that used to make this such and easy craft.


So a couple of years ago we decided to have a clock day and we set aside one day to cut out all of the rounds and the other day to paint and decorate. And the best part about that is that since we were cutting it out we could make it as big as 48" if we wanted to. So here are pictures of a 36" (top) clock and a 42" clock (bottom) that we made. It really is a fun thing to make. When we made clocks we figured the total cost of a 42" clock to be $40 (but we stenciled the numbers and lettering-vinyl lettering may cost more.

I usually get my ideas from magazines. If you like to look of a clock in a magazine copy it! Can you tell? -the pictures on the left were taken from my favorite magazines, do they look familiar???

This is pretty much my only claim to fame while doing a clock demo on the midday news. That was a really fun opportunity.

Click Here for Instructions on making your own clock (PDF format)

Click Here to print off the angle template.


And as with anything on this blog you are more than welcome to share ideas and finished projects with us-just click the link on the sidebar!

Thursday, September 4, 2008

A GREAT PLACE

*update- Al's closed in 2016.  It was a devastating day in my life. :( 

I am not big on advertising on this blog but I am all for sharing great resources.  If a place is truly great, word of mouth is the best advertising!  If you love a place they don't have to pay you to tell others.  You will tell your friends and they trust you and they'll go there and the cycle begins!
I want tell you of a place I love to go to.  Al's Buliding Material and Supplies was in East Mesa on Main.  It was a Salvage Yard too!  They sell all the fun stuff if you are a "junk" collector, and molding/trim (new and salvaged), and new doors as well.  It is a great family owned business that is no frills but all the fun!

Here were some of my favorite places to snoop around at Al's:


Here is SOME of the salvage molding that I like to go through when doing projects that I may not need as much molding.  I say some because this isn't even a quarter of what there is there.  The salvage molding is considerably less, judging by the condition it is in.  I have found molding there to make lattices, do trim work in my house, as well as make a fireplace mantle.  


This the cabinet door section of the yard.  There are so many great ideas for crafts with cabinet doors.  I will have to do a post just with ideas.  Come ready to get dirty!  Yea, don't wear white.  Al's daughters are always prepared with some wet wipes when you check out.  They know if you are digging through the cabinet doors you WILL need them.

As I was leaving a little something caught my eye in this bin--can you see it??  Yes that cute little wood what not was saying "I will be a cute sign!"  It is perfect.  It's already framed out and naturally distressed.  So I grabbed it and I will have to put the finished result on with the cabinet doors.  When I bring these types of things up to the register Al always gives me the look that says "You really want THAT".  I just need to see the potential and its great.  


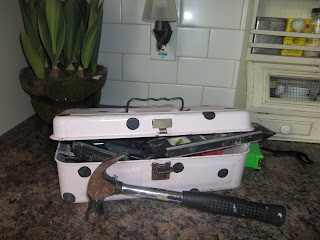
Take for instance this fabulous "Mom's" toolbox.  It was just a rusty old tackle box, then some spray paint later and some craft paint it is my handy tool box.  I Love IT!